AfterCodecs Premiere Pro Audio Features
May 15th, 2021
Full Tutorial on how to use the AfterCodecs Audio Features in Premiere Pro
Table of Contents
What is AfterCodecs?
AfterCodecs is a new native plugin for the whole Adobe CC Video suite, working on both macOS and Windows. It brings fast and efficient codecs to After Effects’ render queue and a new format choice in Premiere Pro and Media Encoder's Export Window.
Premiere Pro has a wide variety of audio options, but they can still be somewhat limited when it comes to supporting certain formats. AfterCodecs gives you more options, especially when it comes to multichannel exports. This article will cover general AfterCodecs audio export settings as well as more specific multichannel and 5.1 options.
AfterCodecs Audio Export Settings
Go to File > Export > Media. Once there, open the Format drop-down menu and select AfterCodecs. Under the Video tab, select your desired wrapper (
.MP4/.MOV) and click Open AfterCodecs Settings.Note: The
.MP4 wrapper does not support uncompressed WAVE audio, you will have to use .MOV to be able to select WAVE.Once the AfterCodecs menu is open, you will find the audio settings under the encoding tab.
If you choose
AAC, select your bitrate using the slider. Keep in mind that a higher bitrate (> 250 kbps) will increase encoding time as well as audio quality. WAVE is uncompressed and will have a high bitrate by default.The compression in
AAC audio can introduce a slight delay between the video and the audio. As a result, it is recommended to use WAVE for any final exports.It is worth noting that
WAVE can also have a large file size due to being uncompressed. This file size will vary based on Bit Depth, Sample Rate and number of channels.Below is an example of the file size for a 10min stereo
WAVE file with various settings: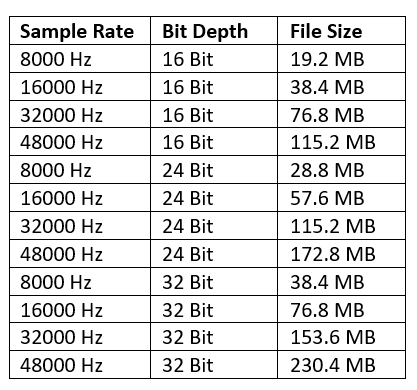
As you can see, what settings you pick can have a big effect on file size, especially for long form content.
Exporting 5.1
Exporting 5.1 with AfterCodecs is a straightforward process but to make sure there are no issues it is recommended you export from a dedicated 5.1 sequence.
Go to File > New > Sequence and select a 5.1 Master under the Trackstab to create your 5.1 sequence. Make sure it also has a 5.1 track.
Once you have added clips to your 5.1 sequence and you are ready to export, open up the export menu and select the AfterCodecs format. For more information about exporting 5.1 check out our audio import/export article.
Under the Video tab, select your desired wrapper (
.MP4/.MOV) and click Open AfterCodecs Settings to select your video/audio codec, as shown earlier in this article.Once you have selected your AfterCodecs settings, click OK and go to the Audio tab of the PPro export window. Select your desired bit depth and sample rate (keeping in mind the file size table from earlier). Then use the Channel Layout drop-down and select your desired 5.1 layout. The most common is 5.1 SMPTE.
Once you are happy with the rest of your settings, click Export and you’re done.
Exporting Multichannel
Multichannel can be quite complex to export and Premiere does have limitations on which formats support multichannel. Using AfterCodecs for multichannel exports removes some of those limitations. For example, you can create an
.MP4 H.264 multichannel file which is impossible in regular Premiere Pro. The AfterCodecs multichannel export is compatible with all codecs in .MP4 or .MOV wrappers.To export multichannel, you have to correctly setup a multichannel sequence first. For more information on how to setup multichannel sequences check out our multichannel article.
Once the multichannel sequence is setup, open up the export settings and select the AfterCodecs format. Under the Video tab select your desired wrapper (
.MP4/.MOV) and click Open AfterCodecs Settings to select your video/audio codec, as shown earlier in this article.Once you have selected your AfterCodecs settings, click OK and go to the Audio tab of the PPro export window. From the Channels Layout drop-down menu select one of the multichannel options:
- Individual Stereo Tracks : This will export all the channels in your sequence as stereo tracks. For example, if you have 6 channels in your sequence, the export will contain 3 L/R stereo tracks.
- Individual Mono Tracks : This will export all the channels in your sequence as mono tracks. For example, if you have 6 channels in your sequence, the export will contain 6 mono tracks.
- One Multichannel Track : This exports all the channels in a single track, which is a multichannel track containing in the original orders each channel.
Below the channel layout, you can select bit depth and sample rate. Remember to select these carefully as they can greatly affect file size, especially with
WAVE.Once you are happy with your settings, hit Export and you will have a multichannel file! If you have issues with the channels in your file, make sure to double check your track channel assignment in the multichannel sequence. For more information on multichannel, check out our multichannel article.
If you have requests for new audio features or experience any issues, please do not hesitate to contact the AfterCodecs team.
Install and try AfterCodecs for free from here ! 500 Frames trial included as well as the full version if you have a license.
The BRAW Studio Panel BRAW Settings tab
Our V2 update of BRAW Studio introduces a new tab of our panel to let you color grade in a more efficient way and with batch modifications to a selection of .BRAW !
Read more
PlumePack Options Explained
What are the PlumePack options ? You should get all information here !
Read more
PlumePack your Project with Proxies
How you can use PlumePack if you are working with Proxies in your project !
Read more
BRAW Studio Version 3 Upgrade
Learn about the new features of BRAW Studio V3 and the upgrading process
Read more
BRAW Studio App: A New Powerful Tool for BRAW Files
Details about the new BRAW Studio App: a BRAW Player where you can edit Settings, trim and more!
Read more
Fast Color Correct with the BRAW Studio White Balance Picker
Indicate the white/grey part in your BRAW image to set automatically Color Temperature and Tint accordingly !
Read more
Apply your Custom LUT directly to BRAW
BRAW Studio now lets you apply your own custom LUT, processed through the official Blackmagic RAW SDK like an Embedded LUT ! Here is a quick tutorial to do so
Read more